Make an HTTP Request
Why use Flow Action Extensions for HTTP requests
Shopify Flow includes a built-in Send HTTP request action, but that action is only available on specific Shopify plans such as Shopify Plus, Advanced, or Grow. If your store is on the Basic Shopify plan, you can still send requests to external APIs and web servers by using Flow Action Extensions.
In Flow Action Extensions, you create the request once in the app and then select it inside your Shopify Flow workflow by using the HTTP Request action.
What you will build
In this example, you will create a workflow that runs every 10 minutes, finds products that are not already stored in Airtable, and sends them to Airtable.
This setup uses these app areas and labels:
HTTP Requests to create the request template
Create request to add a new HTTP request
Event History to review request results
HTTP Request inside Shopify Flow to run the saved request
Video Guide
Here you can see the screen recording of the whole setup, creating HTTP request, secrets and flow to send the products to Airtable. (video has no voice) At the end of video, I was not able to fetch the products because there was space in the query. I cross checked from the existing flow.
I have attached the HTTP request and the Flow that you can import and modify to use it.
Before you start
You have installed Flow Action Extensions.
You have access to Shopify Flow.
You have an Airtable base id and table ready to receive product data.
You know your Airtable API URL and authorization token. You can create access token with right permissions from this url
Create the secrets
If you want to avoid placing credentials directly in the request, save your Airtable token first as a secret and reference it with {{ secrets.yourKeyName }}. Creating the secrets will help you reuse them easily.
You can create the secret from the Secrets page, Create Secret button.
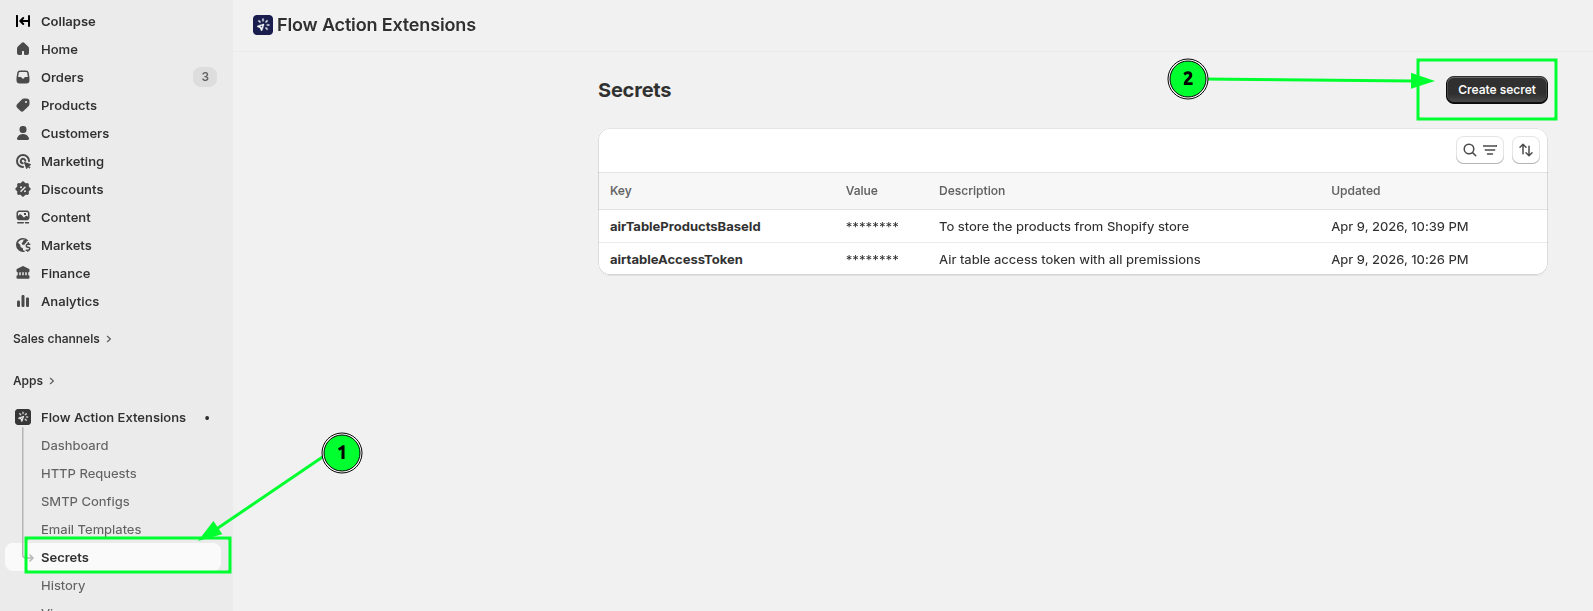
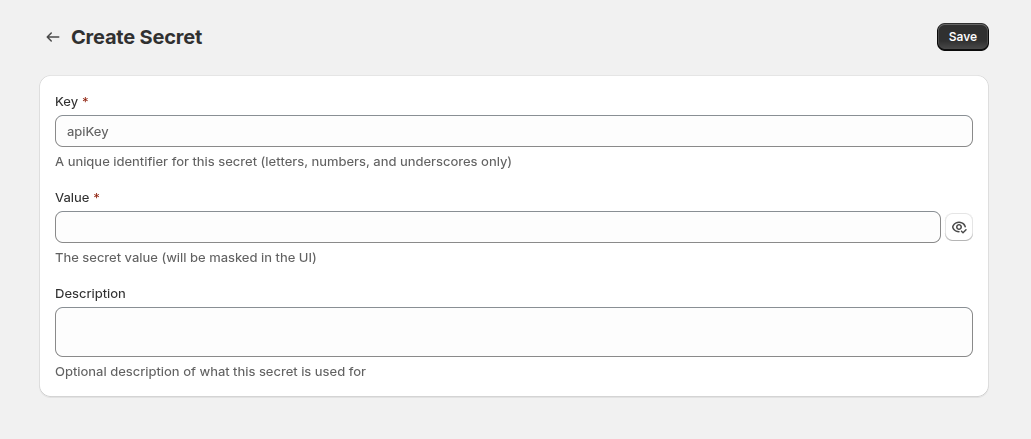
Then save the key, value and give description to for more details and save.
I have saved the personal access token and the base id in the secrects.
Step 1: Create the Airtable request in Flow Action Extensions
I am using the create rocords from the Airtable API, you see more information following the link above.
In Flow Action Extensions, open HTTP Requests.
Click Create request.
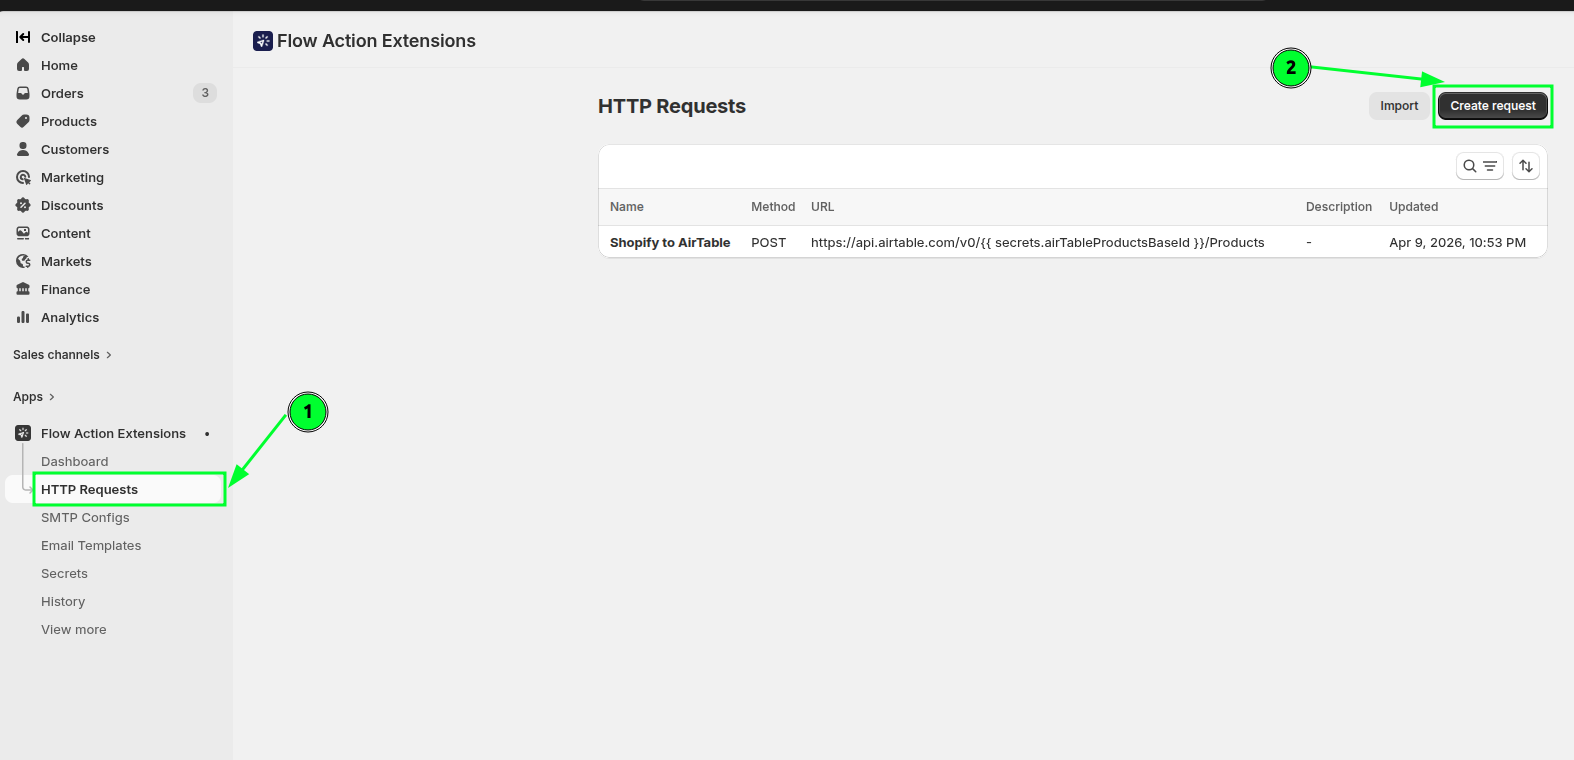
Give the request a clear name such as Create Airtable product record. This is the name you will look for later inside Shopify Flow.
Select the HTTP method that Airtable expects for creating records. In most Airtable create-record setups, this is POST.
Enter your Airtable endpoint URL in the URL field.
api.airtable.com/v0/{{ secrets.airTableProductsBaseId }}/ProductsIn the following image, you can see how the Airtable endpoint URL maps with the base and you can adjust your url accordingly.

Add the headers required by Airtable. A common setup looks like this:
Authorization: Bearer {{ secrets.airtableAccessToken }}
Content-Type: application/json
In the request body, enter the JSON payload that Airtable should receive. Map in the product values you plan to pass from Shopify Flow.
{
  "records": {{ variables.records }}
}
the data looks like this to create the entry:
"records": [
      {
        "fields": {
          "Title": "Classic White T-Shirt",
          "Handle": "classic-white-tshirt",
          "Product ID": 1001
        }
      },
      {
        "fields": {
          "Title": "Eco-Friendly Water Bottle",
          "Handle": "eco-water-bottle",
          "Product ID": 1002
        }
      }
    ]
But in our case, we have used the records as variable and we will pass the variable as a stringified JSON array containing fields to create. We will see it next step while creating the flow.
Our final request looks like this: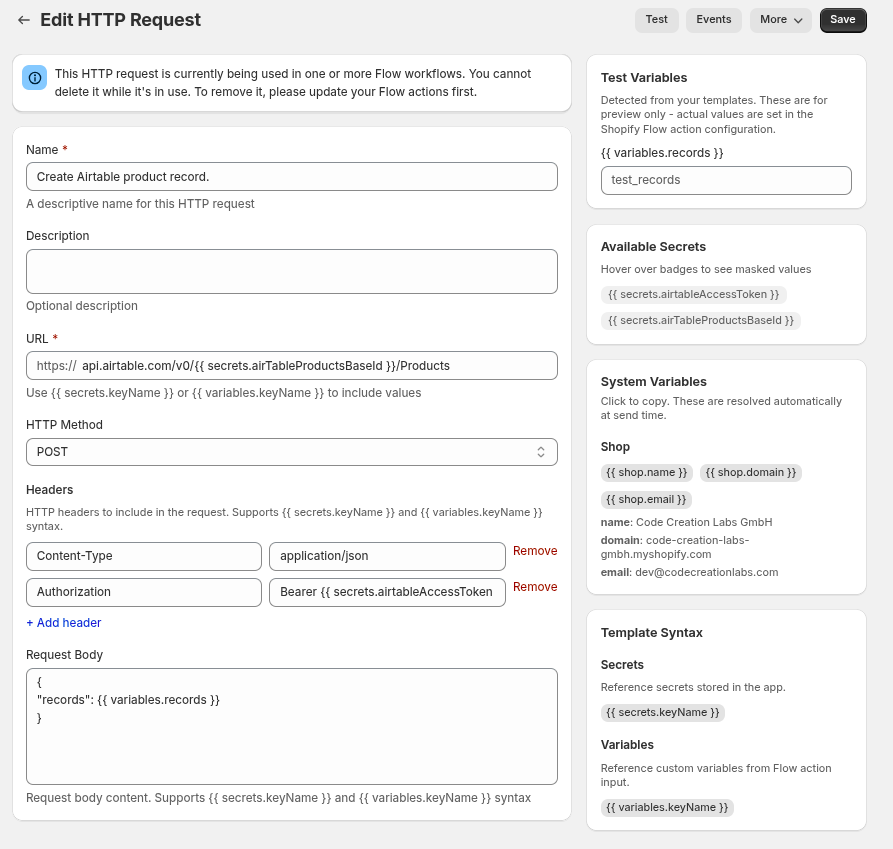
Save the request. It is now available to select in the HTTP Request action in Shopify Flow.
Step 2: Build the scheduled workflow in Shopify Flow
Next, create the workflow in Shopify Flow that runs every 10 minutes and calls the request you just saved.
Open Shopify Flow and create a new workflow.
Choose a schedule-based trigger and set it to run day at a certain time, I am running this every 10 minutes for DEMO purpose.
This gives you a recurring workflow that checks for products regularly.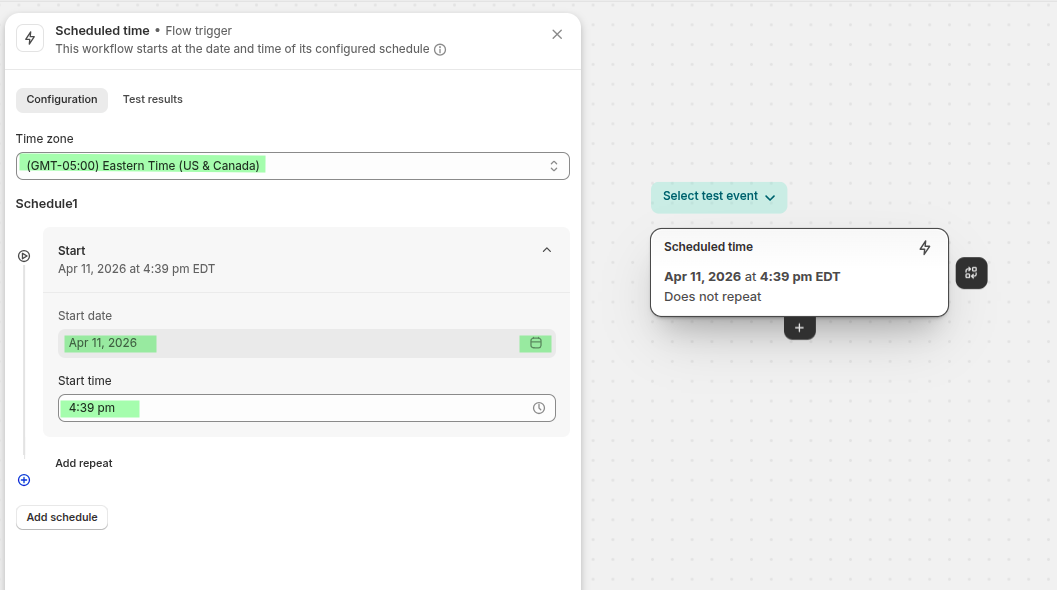
Fech the products that are not yet available in Airtable. The products that are added to Airtable get the tag added-to-airtable in the last step of this flow. In this step we are fetch products that are not tagged with added-to-airtable you can learn more about the query params from this link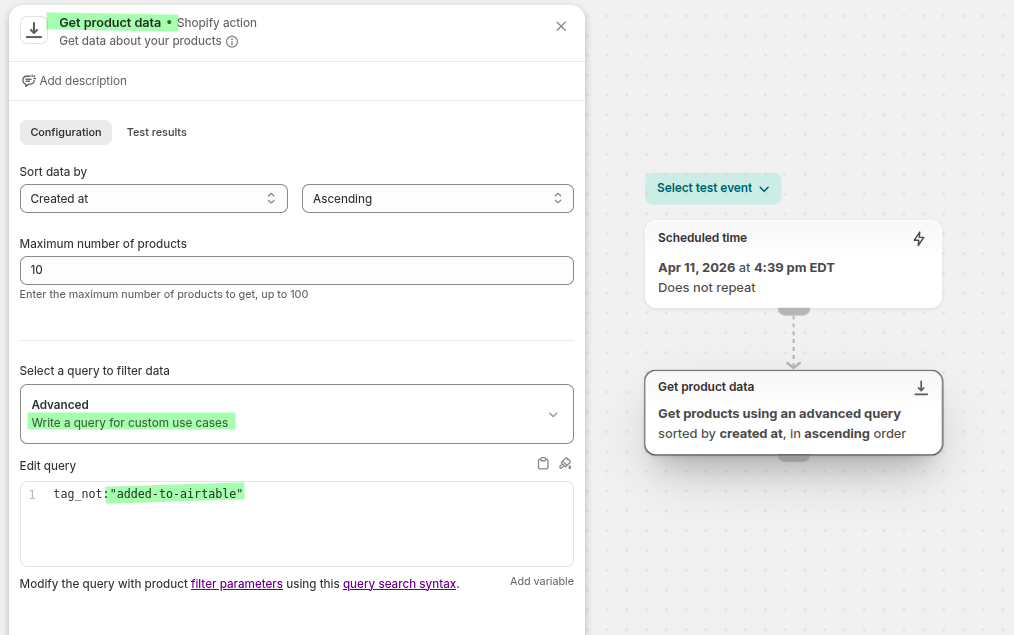
Now we will format the data to pass in the HTTP request, you can see in the step 5 of HTTP request creation, in the body we were using the variable records and in this step we will format the fetched product data to pass as variable to the HTTP request. Select Run code action from the Flow.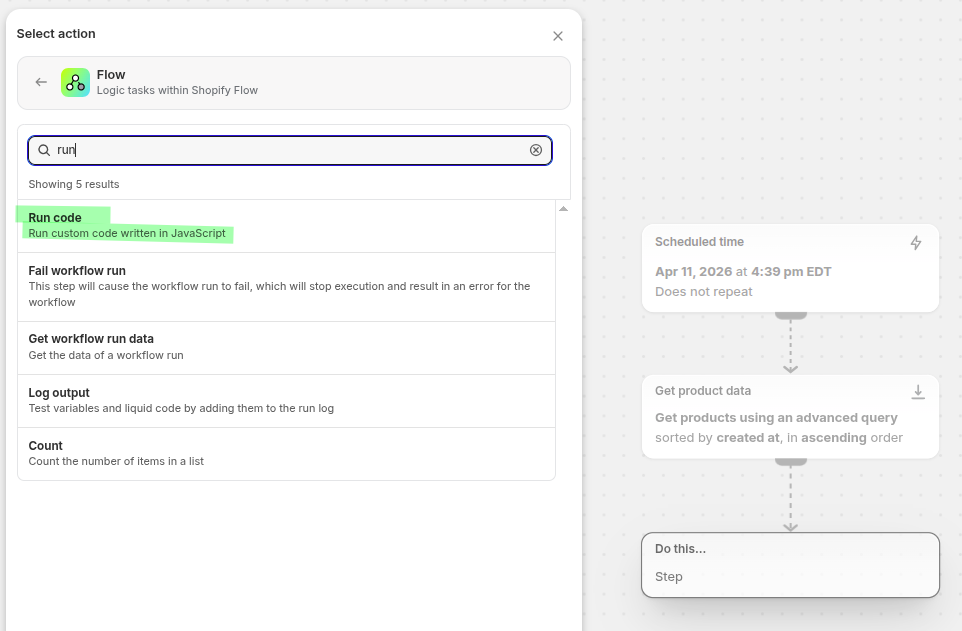
Then configure the step like this: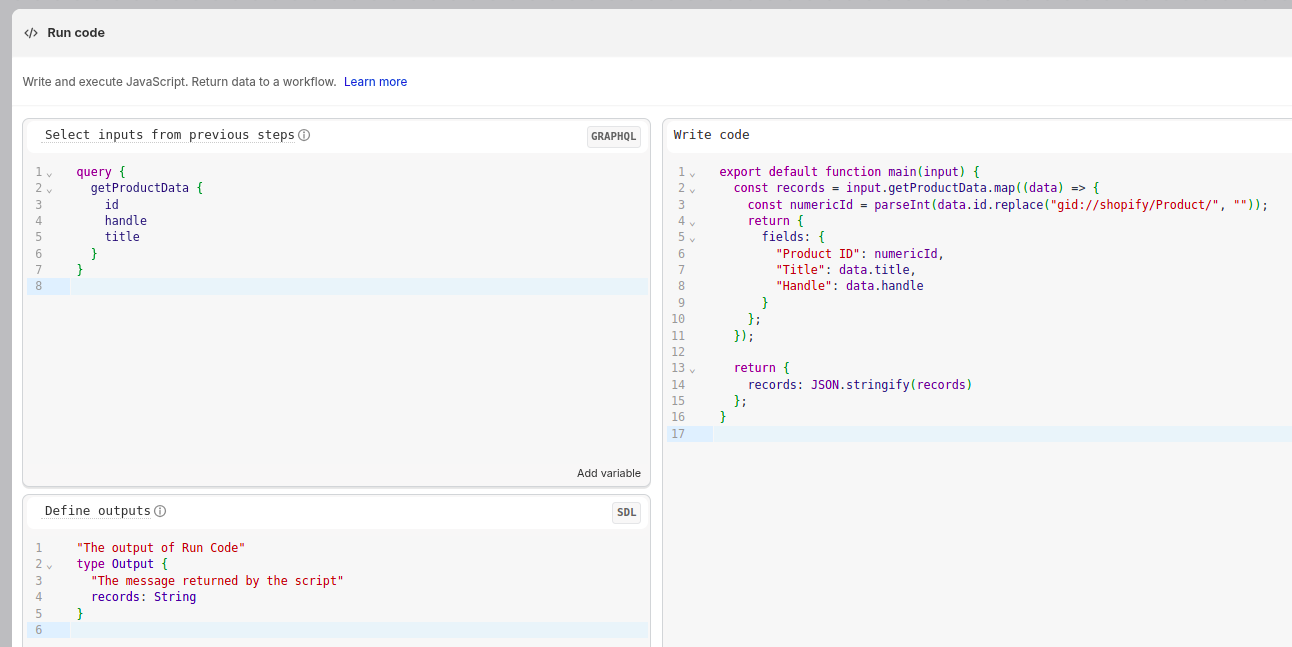
query {
  getProductData {
    id
    handle
    title
  }
}
export default function main(input) {
const records = input.getProductData.map((data) => {
const numericId = parseInt(data.id.replace("gid://shopify/Product/", ""));
return {
fields: {
"Product ID": numericId,
"Title": data.title,
"Handle": data.handle
}
};
});
return {
records: JSON.stringify(records)
};
}
"The output of Run Code"
type Output {
  "The message returned by the script"
  records: String
}
This gives you code that you can preview in right side
Add the HTTP Request action provided by Flow Action Extensions.
When prompted to choose a request, select the request you created earlier, such as Create Airtable product record.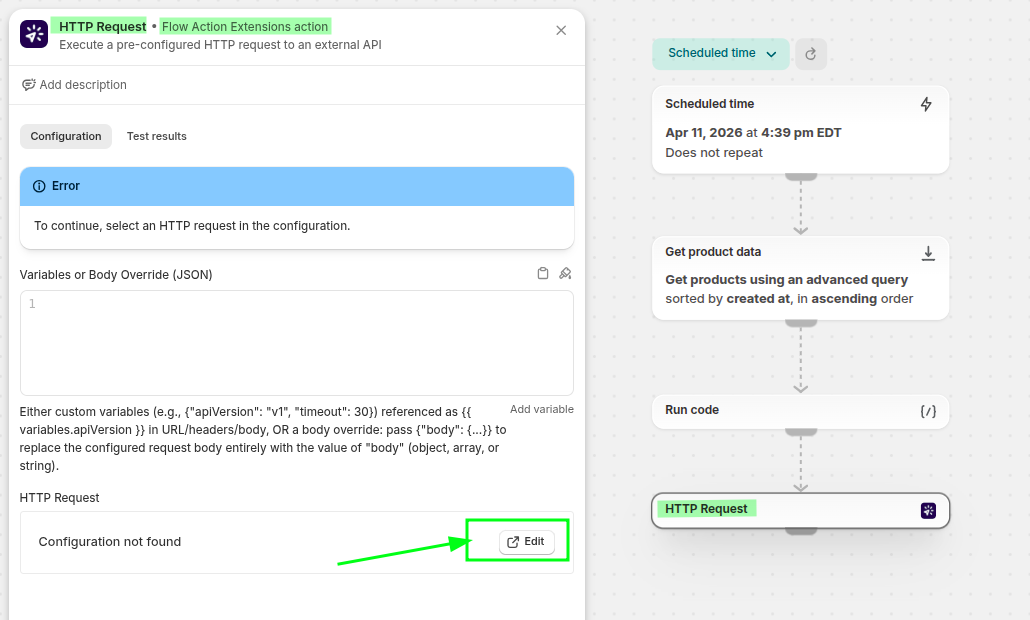
Then select the request, hit save and go back to flow.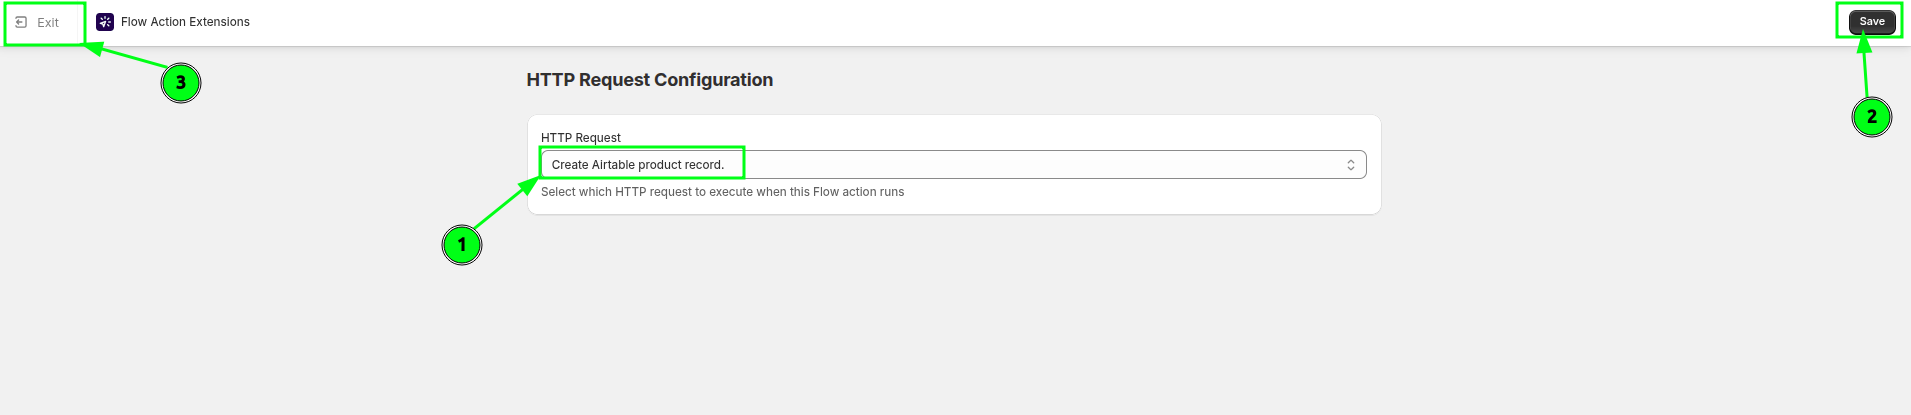
In the HTTP Request Variables input, we will pass the records that we formatted in the previous step.
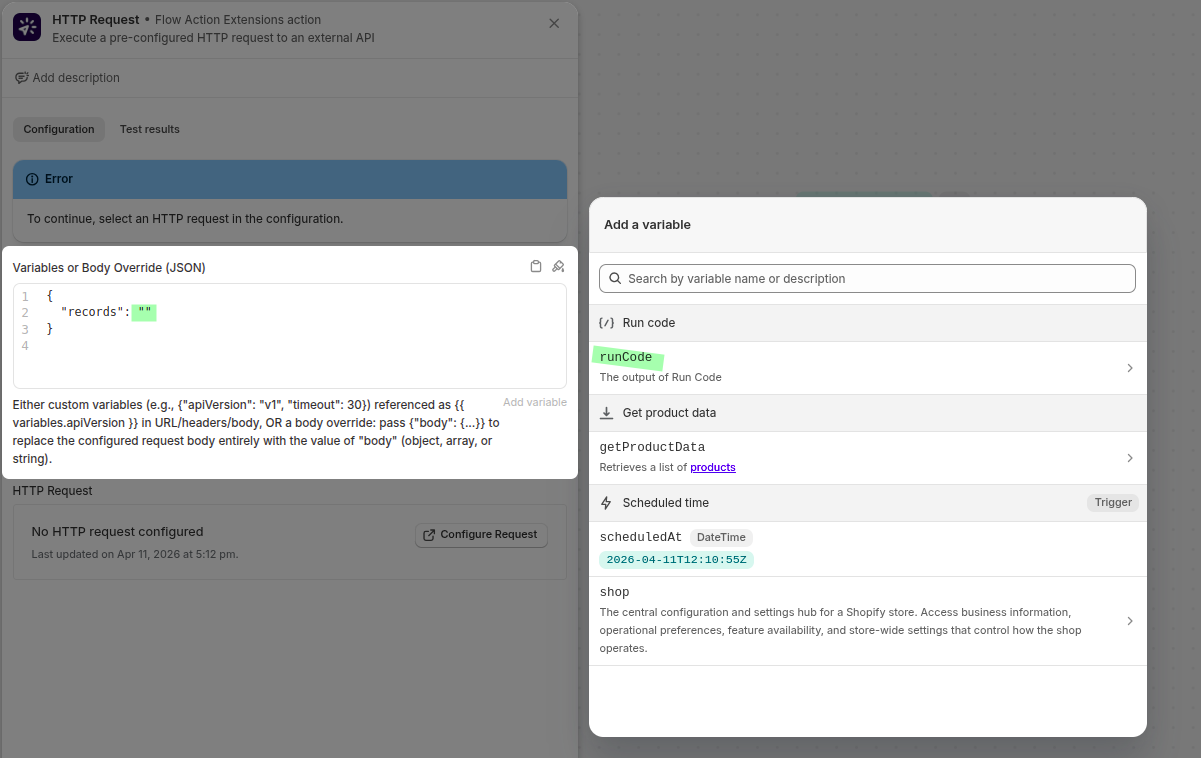
{
  "records": "{{runCode.records}}"
}
These records will be pushed to the HTTP request body.
Now Iterate through all the products that were fetched in the earlier step and tag them added-to-airtable so that these products are not fetched next time the flow runs.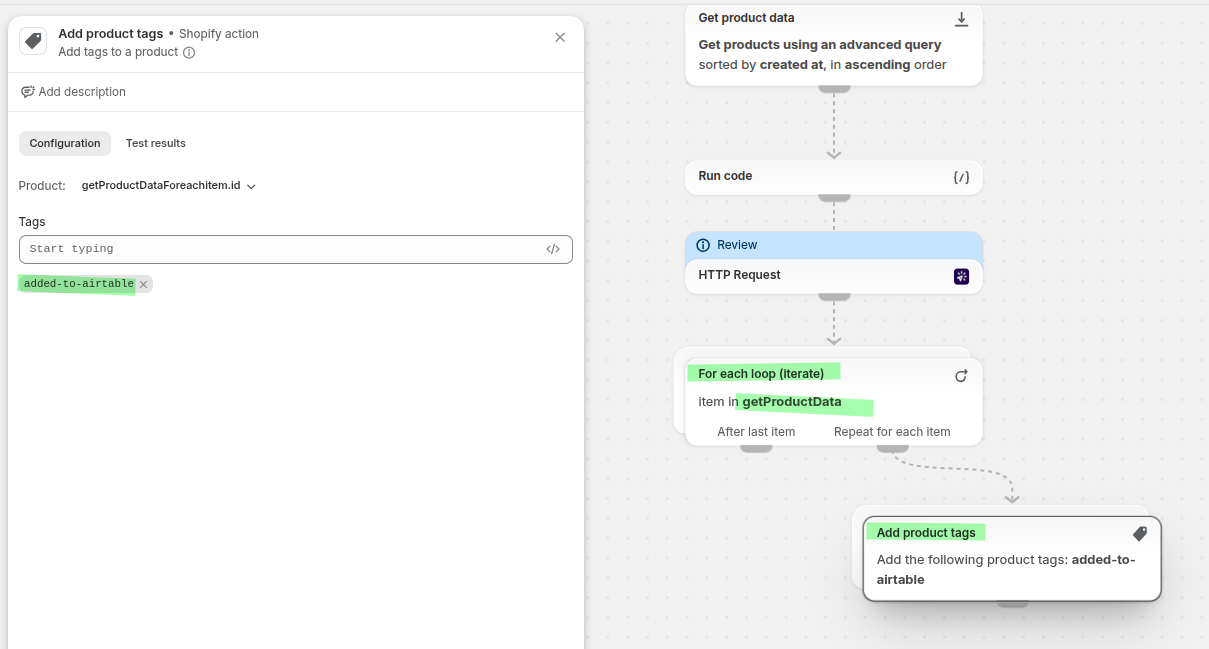
Save and activate the workflow.
In Event History, you can confirm whether the request succeeded and inspect the response returned by Airtable.
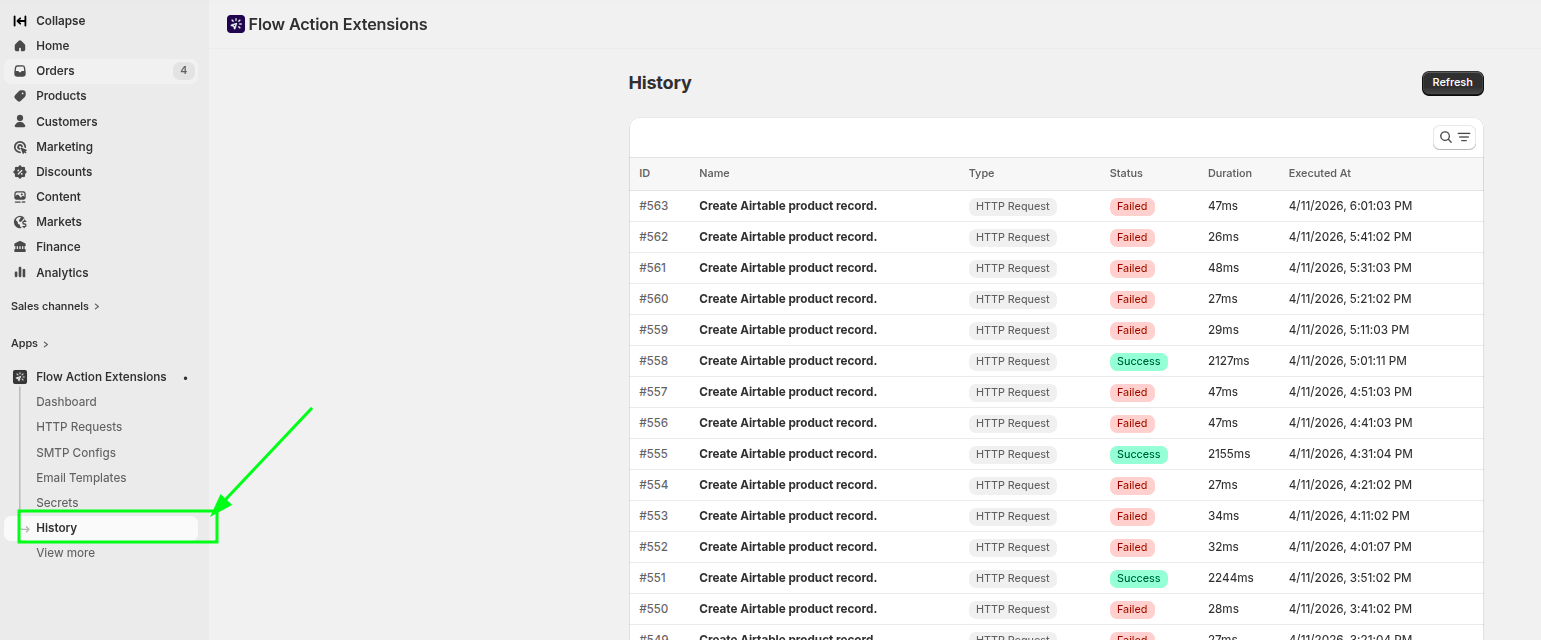
If you open the request, you can see the request data, response data and other metadata for the HTTP request.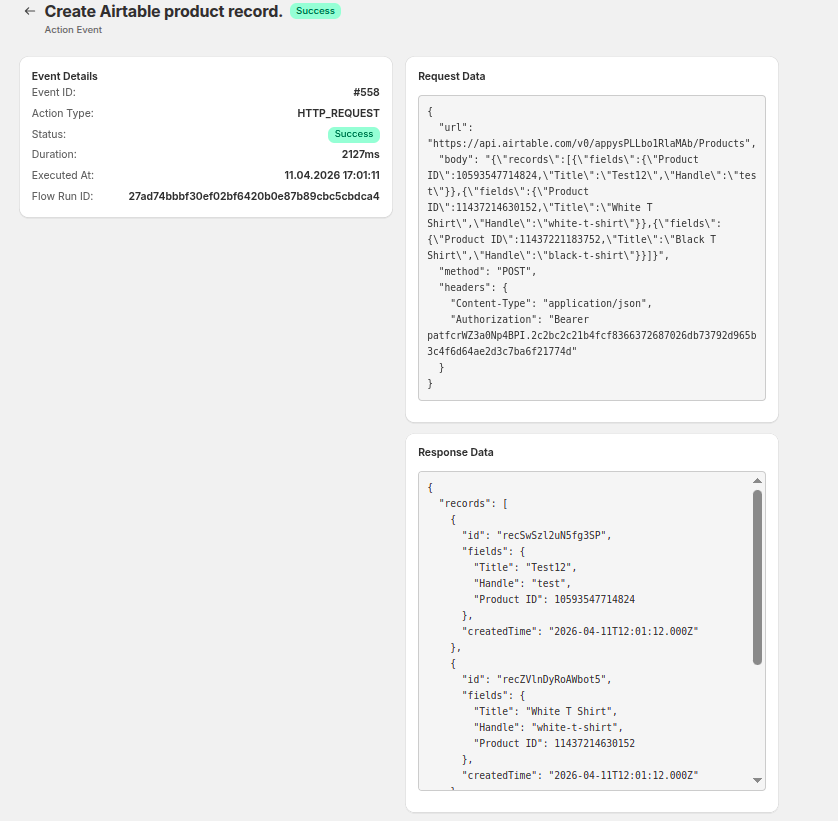
Best practices
Use clear request names so they are easy to find in Shopify Flow.
Store API tokens as secrets whenever possible.
Keep your request body focused on the fields Airtable actually needs.
Use Event History after setup changes so you can confirm the request still succeeds.